Root access unlocks the administrator account on the Nebula Pad, giving you full control over the Klipper system. The process takes less than 2 minutes directly from the Nebula Pad touchscreen — no PC required. A reboot is needed at the end before you can connect via SSH.

Table of Contents

✅ Before You Start — Peace of Mind

Enabling root access on the Nebula Pad is one of the safest modifications you can make to your printer.

  • It does not modify the firmware
  • It does not change how your printer works
  • It does not affect your prints in any way
  • It is fully reversible — a factory reset restores the original state
  • The entire process takes less than 2 minutes directly on the touchscreen — no PC, no tools, no risk

The risks only come later, from what you choose to do with root access — modifying system files incorrectly, or applying a Creality firmware update that could overwrite installed components. But that’s for another day. Right now, enabling root access is completely harmless.

One small note: Creality’s warranty terms may technically consider rooting as grounds to void your warranty. In practice, the operation is invisible and leaves no trace — but it’s worth knowing.

What is Root Access?

The Nebula Pad runs a modified version of Android on top of a Linux system. Like any Linux system, it has a special administrator account called “root” — the most powerful user account on the system, with unrestricted access to all files, settings, and system commands.

By default, Creality locks this account to prevent users from modifying the system. This is a deliberate choice to maintain control over the user experience and prevent accidental damage.

Enabling root access does not replace or modify the Creality firmware. It simply unlocks the door to the administrator account that was already there. The Nebula Pad continues to work exactly as before — but you now have full access to the underlying system.

Why Enable Root Access?

Root access on its own does not change anything visible on your printer. It is the foundation that makes everything else possible:

  • Connect to the Nebula Pad via SSH — access the full Linux system from your PC terminal
  • Install Fluidd or Mainsail — professional web interfaces to monitor and control your printer from any browser
  • Edit printer.cfg freely — tune every Klipper parameter without restrictions
  • Install Klipper plugins and macros — extend your printer’s capabilities
  • Apply community fixes faster — without waiting for Creality firmware updates

Without root access, none of the above is possible.

Prerequisites

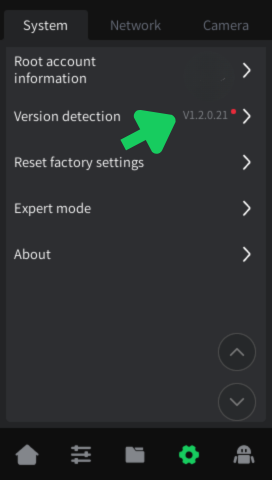
Before starting, make sure your Nebula Pad is running firmware v1.2.0.21 or later. To check your current firmware version:
  1. On the Nebula Pad, go to Settings → System
  2. Scroll down to find Version detection
  3. Tap it to check your current version
Settings System showing Version detection
Settings → System — Version detection and Root account information.
If your firmware is older than v1.2.0.21, update it before proceeding: → Download the latest firmware — Creality Ender 5 Max

Step 2 — Accept the Disclaimer

A disclaimer screen will appear — this is just a standard Creality formality. A countdown timer will run before you can interact. Once it completes:
  1. Check the checkbox — “I have read and understood the risks of root login”
  2. Tap OK
Root disclaimer screen with checkbox and OK button
Root disclaimer screen — wait for the countdown, check the box and tap OK.

Step 3 — Confirm Root is Active

You are immediately returned to the System menu. You will now see the “Root” badge appear next to “Root account information” — this confirms root access is active.
Settings System showing Root badge
Settings → System — the Root badge appears next to Root account information.

Step 4 — Note Your Credentials

Tap Root account information again to view your SSH credentials:
  • Account: root
  • Password: creality_2024
Root account information showing credentials
Root account information — your SSH credentials are displayed here.
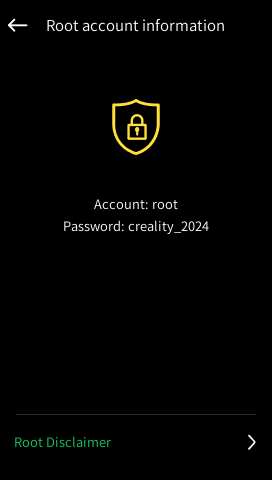
⚠️ The default password is creality_2024. It may vary depending on your machine and manufacturing date — always use the password shown on your screen.

Step 5 — Reboot the Nebula Pad

Before you can connect via SSH, you must reboot the Nebula Pad. Simply power cycle the printer — turn it off and back on.

⚠️ If you skip this step, the SSH connection will be refused in the next tutorial.

What’s Next?

Root access is now enabled — your Nebula Pad is ready to be unlocked to its full potential. The next steps are straightforward and well documented:

Compatible Printers

This tutorial was written and tested on the Creality Ender 5 Max with firmware v1.2.0.21.

The procedure may apply to other Creality printers using the Nebula Pad, but this has not been verified. If you have confirmed this works on another model, feel free to leave a comment below.


Tutorial by Christian KELHETTER — feel free to share and adapt with credit.
v1.0 — April 2026